Lesson Overview:
In this lesson, students make a book using upcycled or recycled materials. They then fill the book with the weather words they collected in the first lesson. They can choose to write a fiction story similar to Cloudy with a Chance of Meatballs by Judi Barrett. Or, they can make a weather word illustrated dictionary.
Lesson Plan:
Suggested Grades:
3-4
Objective:
- To learn to make a simple book using recycled materials (can also be an Eco Week Project.)
- To begin to fill the book with weather-themed words or write a weather-themed story. (Fill the book in whichever way makes most sense for your class.)
Suggested Time:
45 minutes to make the book and to complete the cover. Books can then be finished over time, little by little, whenever kids have a few free moments.
Success Criteria:
Each student will make a book from recycled materials and decorate the cover with an illuminated letter.
Lesson Outline:
1. Introduction:
Books have changed over time. Hundreds of years ago, books were all made by hand. In modern times we have eBooks! Today we will make a book with our hands using recycled materials and decorate the cover using an historical technique with illuminated letters.
2. Main:
Demonstrate how to make the books. Prepare by watching and using the technique in Susan Kapuscinski Gaylord’s video here:
https://www.youtube.com/watch?v=zW30a5mRT04
Help the kids make the books. I usually use terminology like this:
- Fold each paper in half so that it is long and skinny, a “hotdog fold.”
- Make sure that any marks on the scrap paper are on the inside of the fold.
- Fold the long skinny pieces in half, “sandwich folds.”
- “Nest” the folded pages inside each other. Be sure that all folded edges are UP and all loose edges are DOWN.
- Match corners and then punch two holes in the left-hand side. The holes should be about 6 cm apart.
- Push the rubber band through the holes and loop it around the stick/pencil/crayon on both ends to complete the binding.
The rubber band is the hardest part for kids to manage on their own. It will take about one adult for every eight kids to ensure that the books are put together correctly.
Ask the children to write their names on the backs of the books once the books themselves are complete.
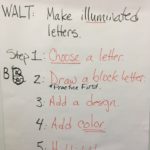
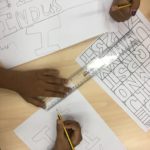
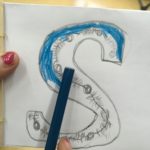
Cover Illustration: Show the children how to make a block letter and have them choose a block letter that matches one of their weather words. They should have time to work on the cover illustration.
Give the kids these five steps:
- Choose a letter.
- Write a block letter (practice first on a piece of scrap paper!)
- Sketch in a design
- Add color
- Add “illumination” – an outline, highlight, or bit of gold/silver to make the letter beautiful!
3. Conclusion:
Make sure that every child has a completed book, that there is a cover illustration, and that the child’s name and class are on the back cover.
additional Resources:
- Two sheets of scrap paper per child. If the weather books need to be a bit longer, use three sheets of scrap paper per child.
- One stick, old pencil, or crayon approx. 8-10 cm. in length per student (If you can’t find enough old pencils, you can use a craft stick.)
- One rubber band per student.
- Hole punch.
Notes:
Kids REALLY enjoy this activity. Be prepared for them to want to make more than one book, or to make their books longer or larger. I usually let them make one to work on at school and one to take home for fun so long as the materials hold out.
Susan Kapuscinski Gaylord is an expert on bookmaking with children. She has published a book herself which contains bookmaking techniques from around the world. I have purchased her book and have found it to be a valuable resource. If you would like to have a look at it, you can find it either on amazon or Etsy.
Handmade Books for a Healthy Planet by Susan Kapuscinski Gaylord.
Key Terms:
Bookmaking, Upcycling, Handmade Books, Crafts, Publishing, Weather
recommended texts:
Handmade Books for a Healthy Planet by Susan Kapuscinski Gaylord.
block/illuminated letters:


